Today on the blog we are going to talk you through a basic yard hydrant installation. Some things get overlooked often. We’ll cover the need-to-know items that everyone should know before attempting to install a hydrant.
*** If you are very inexperienced, this may be a job you want to hire a professional to do. We would recommend a licensed well driller or service provider as the best option. ***
Yard hydrants are fairly simple plumbing fixtures. Proper installation is the best way to mitigate a host of future headaches. The most common hydrant problems stem from improper installation.

Choosing a location and hydrant
You need to pick a location and choose a hydrant before you start your installation. Picking a location is the first step. This can help determine which hydrant you will choose. Here are some questions that you should ask yourself when deciding where you should install your hydrant.
- Where do you want water, and what are you going to be using it for?
- How much water do you need?
- Does it need to get there fast?
- Is this a hydrant that will get used daily, even when the temperatures are subzero?
Like most things, different brands/designs of yard hydrants will have different strengths and weaknesses. Knowing what your priority is will help you decide which hydrant brand is best for you.
Picking the correct bury depth
You need to pick the proper length for your location. Hydrant lengths are referred to by their “bury depth”. Like the name suggests, bury depth is the depth of the hydrant that will be below ground. If a hydrant says it’s a “6 foot-bury”, the hydrant is designed for the bottom 6 feet to be buried. The hydrant head will end up about 24’’-30’’ above ground level. The overall length of a 6 foot-bury hydrant is 8 1/2-9 feet. Across the contiguous United States, frost depths vary from 0 to 8 feet deep. Make sure that your water lines are deeper than the frost line. This ensures that you will have water to your yard hydrant every day of the year.

If you only need a hydrant for seasonal use, you can bury the waterline at a shallower depth. The waterline would need to be shut off and winterized in this situation. This can be done by either draining or blowing the water out of it. It can freeze and break, causing an underground water leak if it’s left full of water.
Hooking into existing water supply
You have your hydrant, and you know where you’re planning to put it. Now it’s time to figure out where you need to dig. Yard hydrants need to connect to a pressurized water line. These lines connect to either a private well or public water supply. Water lines can be made from various materials and come in many sizes. It is helpful to know what kind of waterline you are connecting to so that you have the correct parts on hand for your project. Waterlines aren’t made of a material that can be tracked so locating them can be difficult. Many water lines are buried quite deep underground.

Finding a Waterline
A common place to find a waterline to hook into would be an existing hydrant. Another option would be from an automatic livestock watering fountain. You can certainly dig between the well and the house to find the connection there. Most installers will dig a straight line between the two because it’s the most efficient.
Be aware that water lines don’t always travel in a straight line. Sometimes because of things we can see such as existing structures, flower beds, or natural items such as trees or large rocks. In general, waterlines can be tricky to find, so your best option may be to hire a professional to do the job. If you still want to install your hydrant yourself, I recommend trying to find the installer or any records of hydrant installation to see if someone has an idea on where the lines were put. It can get expensive and make a huge mess if you are digging around trying to find an existing line.
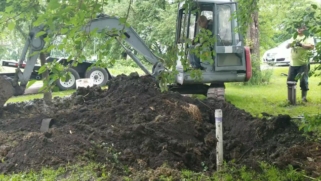
Digging the trench for the waterline
Once you’ve found where you will start digging (an existing waterline) you need to dig a trench over to where you want to install your hydrant. It’s important to keep the waterline as deep as you plan to bury the hydrant, if any part of the line ends up in a frozen section of ground, you won’t have water to your hydrant until the frost comes out. That may be a few days, or it may be months.
If you come across any sharp rocks or have a gravelly soil type, remove the sharp rocks from the trench and consider encasing the buried waterline with sand. This will add an expense, but the alternative is an underground water leak which will lead to digging the hydrant back up. This happens because the ground is constantly shifting and moving a tiny bit during freeze thaw cycles. The ground also shifts a bit when water is moving through it from rain. Leaving a waterline unprotected in a gravelly trench could potentially cause the sharp rocks to puncture the line. This causes a slow underground leak. These slow leaks may take a long time to surface, adding wear and tear to your well pump. Even a slow drip can result in the loss of hundreds of gallons of water.
Installing the new hydrant
Are you already imagining the mess that digging in a new hydrant will create in your yard? Do you want to install a hydrant in a way that will maximize its life expectancy as well as make replacing it easy and mess free when it inevitably goes bad? We recommend installing every new hydrant with the Hydrant Assist Kit.

A Hydrant Assist Kit is a simple but effective system that takes your yard hydrant to the next level. It does two amazing things: it extends the life of your hydrant by removing the soil contact from the vertical pipe, and it allows you to repair or replace the hydrant from the surface within seconds without needing to dig. To learn more about upgrading your hydrant, check out our “All About the HAK” page.
Hooking up the hydrant
Once you dig the waterline trench over to the location for your new yard hydrant, it’s time to connect the yard hydrant into your waterline. We always recommend turning the water on at this point to ensure that the connection is tight and that no water is leaking. Once you know it’s not leaking, you can shut the water off again until you are finished with your hydrant installation.
Yard hydrants work year-round because the vertical pipe drains out underground when it’s not in use. The drain hole must be kept clear of small particles and the water needs to have somewhere to go. Putting in ½’’ washed river rock is a great way to achieve this. We would recommend 2-3 five-gallon buckets full for a standard installation. If your soils are silt or clay based, you should double or triple this amount. Putting extra rock in allows your hydrant to have a longer lifespan before it has any troubles draining.

Closing up the trench
Your hydrant installation is finished. It has a good connection and a nice base of rock for drainage. Now it’s time to back-fill the trench. Keeping the hydrant level will give you the best finished install. Use a hand level multiple times on different sides of the riser pipe to ensure that it’s not tilting in any direction as you carefully fill in the trench with your soil material.
When you dig up soils, they don’t go back into the ground perfectly. It is typical to see settling at a site after the first few rainfalls or freeze-thaw cycle. Sometimes settling is not acceptable. In these situations, we recommend digging the black dirt off the top and saving it. Discard any material below that. Replace that material with sand when backfilling and then top with 6-12’’ of black dirt. As you backfill with your native soils, heap them up over the trench area so that they will settle back down into place. Seed the site. You’re done!
If you enjoyed this blog, we will be posting one every other Friday. Check back in two weeks to find out more about how to pick out the best hydrant for your specific needs.


